The idea came like this: I got the Stella Parks Brave Tart book some time in early April, and it has a complicated doughnut recipe that involves mashing up a potato. I thought I might try it. Then one day I was browsing through Half Baked Harvest’s blog and came across some brioche doughnuts she made with a pretty strawberry glaze. That reminded me that all my favourite store-bought doughnuts are brioche doughnuts. To be safe, though, I googled some more brioche doughnut recipes and came across the winner – Justin Gellatly from Bread Ahead Bakery in London, whose doughnuts I have definitely eaten in Borough Market, has a recipe! Also, it’s from the recipe book I have been eyeing forever but still haven’t bought!
So of course I gave this recipe a try. And then I made it again because it’s SO GOOD. I halved the recipe each time, so really, I only made one batch?
The end result is so fluffy and light, that the first time we ate it, we inhaled 7 doughnuts between 3 adults, 1 toddler and 1 baby in one sitting. Then I double-checked the ingredient list and even measured out the oil I used up in frying the second time around, to do a quick calorie calculation. It turns out, each doughnut is only about 116 calories (before glazing/sugaring)! Considering that some weight loss programmes have 100-calorie snacks, I’d say these are not looking too indulgent, but they are so much more delicious than cardboard-esque granola bars and “sugar-free” desserts.
The recipe is very easy to put together but does take time. You’ll need to let the dough rise in the fridge overnight for a second proofing, so manage your time accordingly!
Brioche Doughnut Ingredients (you can easily double the recipe as it was originally double and I halved it to tame the glutton in me)
- 250g flour (I used all-purpose, but if you have bread flour, it’s recommended)
- 30g sugar
- 3g salt
- 3g instant yeast (or 7.5g fresh yeast if you can find it)
- 2 large eggs
- zest from 1/2 lemon
- 75g water (room temperature/tepid is okay, doesn’t have to be warm)
- 62.5g butter, softened
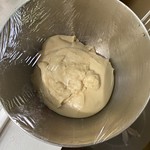
- Roughly whisk together flour, sugar, salt, and instant yeast so it’s mixed together evenly. Then put everything but the butter in your mixing bowl and, using the paddle attachment, beat for 8 minutes on medium high speed.
- The mixture is ready for the next step when it forms a dough that pulls away from the sides completely without much interference. (I stop the mixer once or twice to scrape it down because I’m not using my own KitchenAid with the scrape paddle these days.) Let the dough rest for a minute or two before the next step.

- Beat in the butter in 2 – 3 additions, then continue to beat on high until the dough is super elastic, shiny, and tacky but doesn’t stick to surfaces and your hands hopelessly.

- The dough is now ready to rise at room temperature for 2 – 3 hours, until at least double. I made a mistake the first time and let it more than double, and the end result was so good that I decided to let it rise like that again the second time.

- Punch down once it’s doubled – and you can punch really well here, I sort of just pushed it down and that didn’t help with the frying process later, so if I were doing it again I’d be more thorough about this. Cover and refrigerate overnight.
- When you’re ready to make the doughnuts, remove the dough from the fridge and divide into 20 balls of 25g each. You could make your life easier by making them 10 balls of 50g each, like the original recipe suggested.
- Here’s how to shape a brioche dough ball properly: Lightly flour yoru work surface. Flatten the dough ball to about 1cm thick or less, then fold the edges all in towards the middle (kind of like pinching it closed?) so that there’s a smooth top and a bottom where the edges all join. Cupping your hand, put the dough ball with the seam side down on the work surface and sort of bounce it around within your cupped hand. Swoosh, swoosh…and you’ll have a nice round shape with a flat bottom.
- Let the formed dough balls rest on a floured tray, keeping them about 5cm apart. Cover with cling film, then a tea towel overtop. Let rise at room temperature until doubled in size.


- You’re ready to fry! Heat canola or other good quality high-temperature frying oil to 350 degrees Fahrenheit. Gently remove what feels like light little pillows from the tray. Drop in two balls at a time. Fry for about 1 – 2 minutes on each side until just golden / lightly browned. You should have a ring of dough in the middle that isn’t able to get colour – that’s normal. If you didn’t punch down the dough well enough earlier, you might get huge air bubbles that prevent you from flipping the doughnuts around, that’s okay. Just do the best you can.
- Cool on a cooling rack lined with paper towels. Roll in sugar when it’s still warm (but not hot) if you’d like. Or, try the glaze below.


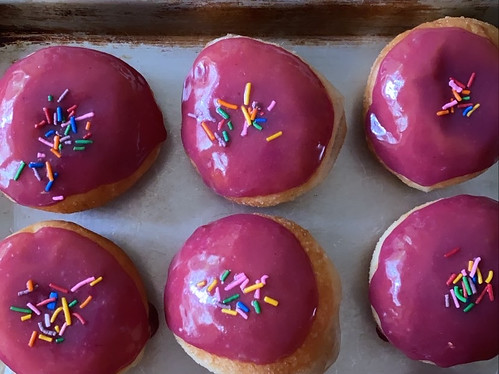
Raspberry White Chocolate Glaze Ingredients (adapted from this recipe from Half Baked Harvest)
- 75g raspberries (I used berries from a frozen bag bought from the store, thawed at room temperature)
- 80g Lindt white chocolate bar, melted
- dash of salt
- 30g icing sugar
- Mash the thawed and soft/mushy berries through a fine sieve strainer, getting as much juice and fine puree out as possible and leaving behind the seeds.
- Mix with the melted white chocolate until smooth, then mix in the icing sugar and stir until no lumps remain.
- Stir and use the glaze at room temperature. You may need to stir every so often to ensure a good consistency. If you need to take a break, cover it up and stir it well before using again.
- Dip each doughnut in the glaze and top with sprinkles or anything else you might fancy. The glaze keeps well at room temperature and due to the icing sugar, will gently crust and set after a while.