≡ Menu

Homemade Pasta: Kneading Away Stress

Pasta

Last Wednesday I got home from work and just wanted to veg. I was agitated, annoyed, and frustrated with everything that’s been happening. To sum up, life at work has been absolutely nutty for the past six weeks, and I have a few things that I am working on outside of work that are adding pressure faster than I could have imagined. The perfect storm for a night to wallow…but then I got an idea – I kneaded to work out the stress. (Sorry, couldn’t help it, the pun was staring me in the face.)

All you need are eggs and flour to make delicious pasta, and here’s something I wasn’t quite ready to admit to the Interwebs just yet: after almost a year, I have finally figured out how to use my pasta press properly! I know where the little latch goes to lock it down on my countertop! Imagine that!

Homemade Pasta
from Michael Ruhlman’s Ratio, which is an amazing book. I’ll talk about that more later.

  • 9 oz. all-purpose flour or fancy flour if you have some (I do not. I shouldn’t be trusted around excessive amounts of carbs.)
  • 6 oz. eggs (I try to add more yolks than whole eggs – i.e. 3 yolks + 2 eggs is roughly 6 oz.)

Add flour in a medium or large bowl. Make a well in the middle of the flour and toss in eggs. Stir together to form a dough, using a spatula or a fork. Once dough comes together (it doesn’t always all come together into one ball – that’s OK), dump onto a well-floured surface and try to continue integrating the dough and the little stubborn crumbs, and start kneading. Kneading, to me, means pushing the dough away with the heel of your hand, folding, turning 90 degrees, repeat. Continue this for 5-10 minutes (closer to 10) while imagining your stress being beaten up in that dough – it really helps! You’ll know when you’re done by looking at and touching the dough. It should feel smooth and velvet-like, almost. Form into a ball, seam side down if you have seams, and cover with the mixing bowl. Let rest on floured surface for at least 10-15 minutes.

Pasta  Pasta

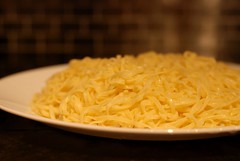
When the dough is ready to be rolled out, divide into 4 parts for easier handling. Cover the dough you’re not using with the bowl. You can roll the pasta out thinly with a rolling pin if you don’t have a pasta press. Make sure if you’re doing so, that you flour everything well and continue rotating the dough as you roll it so it doesn’t stick. Get it as thin as you can, then flour the top well, roll it up gently, and slice into noodle widths with a sharp knife.

With a pasta press, I always find it easier to pass my dough through the flat lasagne press first to get it to my desired thinness, before pressing through the noodle cutters to get the noodle sizes. Again, flouring well is important, as is the patience of slowly working your press. You’ll find that the dough takes on a bit of an attitude in that the pressing process can’t be rushed, so enjoy it. It can be therapeutic to watch your stress get shredded into yummy, thin, delicate noodles!

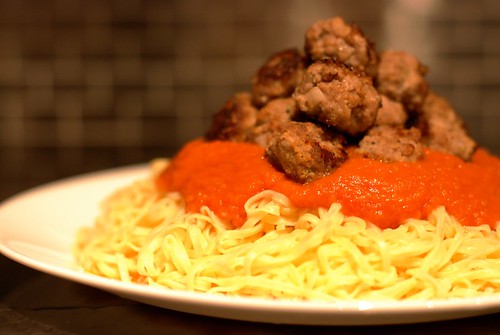
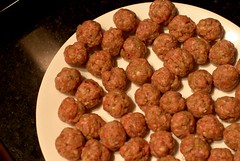
I topped mine with the tomato sauce with onion butter from Deb at smittenkitchen, and some homemade meatballs that I conjured up, but am too lazy to type up the recipe right now. I will soon though – they’re gluten-and-carb-free, which makes over-indulging in pasta a little more justified!

Oh, and an update on the way things have been since last week’s kneading session? Let me just say, at the rate things are going, I think I’m going to have a freezer full of Ziploc bags of pasta soon – and that, my friends, is also known as making lemonade when life gives you lemons.

{ 0 comments }

Happy Pi(e) Day!

Apple Pie

If you’re blissfully unaware of the nerdiness that today inspired, I apologize for ruining this ignorance. Apparently, March 14th is a recognized “holiday” called Pi Day, and yes, people celebrate by having pie at 1:59 (am? pm? undetermined).

While I can’t say I’m a big pie person, Alex loves apple pie. So when he pointed out to me that we should have pie and discuss the relevance of pi on March 14th, I agreed to the pie part. As if I would be willing to impart my views on pi just because it’s March 14th!

Because I am not a big fan of a lot of flaky pie pastry, I made an apple-crisp-pie. It definitely struck a chord and I think it’ll be our compromise from now on…ah, I can’t wait for the strawberry-rhubarb-crumble-pie or the peach-crisp-pie in the summer!

Apple Pie

Basic Pâte Brisée – adapted for my 6″ pie plate, yields about 1 crust
4.5 oz / 1 cup minus 1 tbsp all-purpose flour
3.0 oz. / 3 tbsp cold butter
1.5 oz / 3 tbsp ice cold water
1 pinch salt

Apple Pie Filling – just enough for my 6″ pie plate, again…
0.5 lb. Granny Smith apples (or any other baking apples), cubed
0.5 lb. Granny Smith apples (or any other baking apples), thinly sliced
3 tbsp. packed brown sugar
1 tbsp. granulated sugar
1/2 tsp. cinnamon
1/4 tsp. nutmeg
1/4 tsp. salt
zest and juice of 1/2 lemon

Apple Crisp Topping – again, enough for my 6″ pie plate. Or if you’re making this as strictly fruit crisp, this should cover about 4 little ramekins of fruit.
1/4 cup flour
1/4 cup oats
1/4 packed brown sugar
3 tbsp cold butter
1/2 tsp. cinnamon
1/2 tsp. nutmeg
pinch of salt

Apple Pie

For the pie shell
Cut cold butter into the flour using your fingers, a pastry cutter, or a food processor until the mixture resembles coarse crumbs with pea-sized balls of butter. Work quickly and don’t over-do it! Throw in salt and cold water, and using a fork, bring the mixture together to a dough. Gather into a ball and wrap with plastic wrap. Chill in fridge for at least 15 minutes before rolling out to cover the pie plate. Once rolled out, trim off excess dough with a sharp knife, and put back into fridge while you gather together the apple filling.

For the apple filling
Toss everything together in a bowl and let sit at room temperature while you prepare the apple crisp topping.

For the crisp topping
Mix together flour, oats, brown sugar, salt, cinnamon, and nutmeg in a bowl. Cut in cold butter using your fingers or a pastry cutter. The mixture should resemble coarse crumbs with pea-sized balls of butter. Cover the bowl with plastic wrap and chill in fridge until ready to use.

Putting the pie together

  1. Preheat over to 400 degrees Fahrenheit.
  2. Put apples in the chilled pie shell. You may want to drain the apples first as the lemon and sugars will really draw out the juices from the fruit. I didn’t really mind either way so just dumped the apples into the pie shell.
  3. Cover the top of the pie tightly with aluminum foil. Cut a few vents with a small knife.
  4. Bake, covered, for 40 minutes – you should be able to smell the apples at around the 40 minute mark.
  5. Remove from the oven, uncover, and throw on the crisp topping. Return to oven and bake for at least another 25 minutes, or until the topping is crispy and browned. The edges of the pie should also be nicely browned around this time.
  6. Let cool in the pie dish, on a cooling rack, for about 15-30 minutes before serving. Serve with ice cream or just a dollop of whipped cream!

So there you have it. I did something nerdy today to celebrate Pi Day and Albert Einstein’s birthday. Also, I hear pie makes the whole losing-an-hour-of-sleep thing go down better, too!

Apple Pie

{ 0 comments }

Gold Medal Hockey Game

DSC_0830.JPG

As I alluded to earlier, we had tickets to the Gold Medal Hockey Game at the Winter Olympics, a.k.a. the event Canada had been waiting for, so we set out for a long but exhilarating weekend trip to Vancouver.

Plane tickets between Toronto and Vancouver during the Olympics ranged from $600 – $1,000+ during the games, and the $600 ones were hard to find. So we bit the bullet and did a Buffalo to Seattle trip, with a lot of driving in between.

DSC_0699.JPG
Our tickets

We left Toronto at 2:30AM on Friday, and got to my house in Surrey at 4:00PM EST…long journey, indeed! We stopped at my mom’s work for a delicious lunch, and continued to my house for a quick nap before the Canada-Slovakia game. Due to the fact that my mother does not subscribe to cable (but she listened to the game on the radio!), we ended up watching the game downtown at one of the LiveCity locations. It was drizzling the whole time, which made it quite an interesting experience for the non-Vancouverites in my group, but it was phenomenal to share the experience with lots of Canadian fans huddled in the rain.

DSC_0711.JPG
A little hometown pride just after we crossed the border

The big event came on Sunday morning, when we eagerly showed up at GM Place, or Canada Hockey Place, at quarter past ten – the game didn’t start until 12:15PM. The enthusiasm had all of us on pin cushions that we had to leave Surrey ASAP (well, except me, because I had caught a cold and wanted to stay in bed until the last possible minute).

DSC_0728.JPG
My favourite sign. If you think about it hard enough, it could have been a double-entendre because of the Canadian gold mines….but that’s way too much thinking, I know. And way too geeky. I know.

DSC_0732.JPG
Just after clearing security – Go Canada Go!

DSC_0734.JPG
Yeah, we got there super-early.

Our seats were in the 300’s, and considering the categorization of tickets and the face value, I found it slightly disappointing when we realized where our seats were. There were 3 categories for ticket prices, and I think if there were 4, it might’ve been clearer for people to decide on their bidding price – i.e. 2 categories in the lower bowl and 2 categories in the upper bowl.

That said, once the game started, it felt like I was right there in the middle of the action, anyway. I think I took 10 pictures altogether during the 60-minute regulation time, including during intermissions – it was that captivating.

DSC_0788.JPG
Face-off at 12:15

DSC_0803.JPG
A little scuffle that got the crowd all riled up

During the last intermission between third period and overtime, you could tell the crowd was tense. The split between Canadian and American fans was about 70-30 at the game, I would say, and everywhere you looked, people were holding their breaths. There were fewer people lining up for drinks, fewer visits to the bathroom, and fewer lighthearted conversations between fans.

It’s OK, though, we won. If there was one medal Canada really really really really really wanted, with a cherry on top, this was it. AND OMG WE GOT IT!!

DSC_0824.JPG
The moment I realized we had won. No good pictures needed. I love how blurry this is…it reminds me of jumping up and down, having a giant group hug, and celebrating with strangers all around me.

DSC_0830.JPG
The team celebrating the win – this was the first opportunity I could get a clear shot.

DSC_0922.JPG  DSC_0862.JPG
We left Canada Hockey Place with big smiles, and lots of renditions of our national anthem, as the celebration poured into the streets

DSC_0969.JPG
We joined the crowds at Robson Square – it was a fantastic party!

DSC_0957.JPG
Yay Canada! I wonder if this bus stop is still standing…

Our experience at the Olympics turned out in the best way possible. I could not have asked for a better ending to the game, with all the tension building up for a great big hurrah to finish off our weekend. Being a part of the crowd that celebrated with the team moments after the game finished is something that I will always remember. It was a heart-thudding, never-ending-smiling kind of experience that brings goosebumps now when I look back :-)

How did you celebrate the win, fellow Canadians?

{ 2 comments }