≡ Menu

Old Fashioned Peach Ice Cream

DSC_7947.JPG

In grade 11 I took this random (read: marks not important) class called Food Art. I knew I liked baking cookies and enjoyed the cooking section of Home Ec in grade 8, but I didn’t think too much of it other than I want a class where I don’t have to study for anything. Clever, yeah?

Food Art left a lasting impression, and it definitely pointed me further in the direction of food-loving. I learned how to make choux pastry (i.e. cream puffs), which I made constantly for a month after the class finished because my aunt requested them daily, and I had fun piping random shapes and watching them puff up.

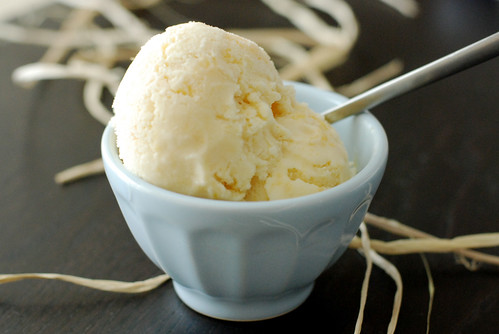
My fondest memory of Food Art definitely comes from the ice cream class. Oh, the ice cream that we made! My little group of four got to pick two recipes, and somehow we picked the custard-based ones for both of them – chocolate, and peach. I think ours were the only custard-based ones in the class, and I remember waiting after school for the ice cream maker to churn because the process took so much longer than the non-custards. When we were finally done, we dipped our spoons in the mixture and licked them clean…and it was a serious revelation. I had never tasted ice cream that good, not even with all the fancy Haagen Dazs that my uncle was addicted to. The flavours were so pure – it was straight up chocolate, or straight up peach. Nothing fussy about them, and they tasted so right.

Since then, I’ve dreamt about having my own ice cream maker and churning out the same delicious peach ice cream.

Then I got one for my birthday this year! A KitchenAid mixer attachment to save space, but works well enough for me.

I also purchased Perfect Scoop: Ice Creams, Sorbets, Granitas, and Sweet Accompaniments by David Lebovitz right after I got my ice cream maker, and have been trying some recipes from there.

After a few tries and reading up on other bloggers’ ice cream experiences, I’ve noticed that the balance between eggs/cream/milk is definitely flexible. While David’s chocolate ice cream recipe had everyone begging for more (it’s a must-have for any ice cream recipe repetoire), for this peach one, I went with my gut instincts and modified the recipe to my liking.

I knew I wanted a custard-based ice cream because I remembered it was a custard when we made in it grade 11. No other good reason, really. Custard-based just means that eggs, milk, and cream are cooked together into a custard along with whatever else (i.e. melted chocolate, peaches, etc.), and it has that distinctive dairy and creamy taste.

Enough with the praises for peach ice cream and on with the recipe:

Ingredients:

  • 1 cup whole milk
  • 1/2 cup sugar
  • 1 tsp vanilla extract
  • 4 large egg yolks
  • 1 cup whipping cream
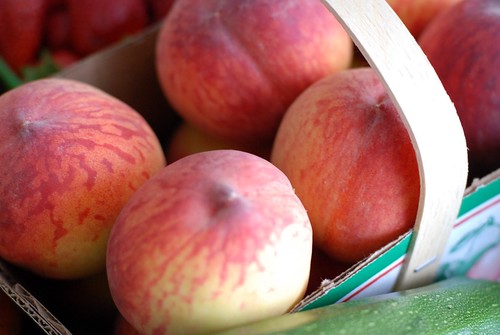
  • 4 large peaches, peeled and smushed
  • 1 tbsp vodka (optional)
  • 1/4 cup sugar
  • juice from 1/4 of a large lemon

The How-to:

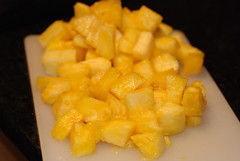
  1. Toss the peaches, 1/4 cup sugar, and lemon juice together in a non-reactive pan and cook over medium heat until just starting to boil. Stir quickly and don’t let it get to a hard boil, and simmer for about 3 minutes or so until you want to bury your face in the deliciousness emitting from the pot. Remove from heat and let sit while you move on to the other steps. Add in the vodka while it’s chilling, but not when it’s boiling. I like to smush my peaches while preserving the juice in the bowl, so that I would still have chunky peaches in the ice cream. Alternatively, you could run it through a food processor before mixing into the ice cream if you don’t want chunks.
  2. Pour the cream into a bowl, and set a fine sieve on top of the bowl. Put this bowl in a cold water bath with ice cubes, if you have them handy.
  3. Whisk together the egg yolks in a bowl with room to spare (i.e. can hold another cup or so of liquid).
  4. In a medium-sized pot, warm the milk, 1/2 cup sugar, and vanilla just until steam begins rising from the milk.
  5. Remove the milk from heat and slowly, tablespoon-by-tablespoon, add into the egg yolk mixture, whisking it lightly as you go along, to prevent cooking the egg yolks. You just need to add about half of the milk into the egg yolks to “temper” the mixture.
  6. Dump the egg yolks mixture back into the pot. Return to heat, and stir and watch carefully. Scraping the bottom so nothing sticks, cook until the mixture is thick enough to coat the back of a spoon. When you run your finger along the back of the spoon, the coat of custard should separate neatly.
  7. Remove pot from heat at once, and pour over the sieve into the chilled cream. This stops the custard from cooking.
  8. Clean and dry the sieve, and pour the peach mixture through it. You should get between 1 – 1 1/2 cups of peaches, plus some liquid (delicious!). Add the drained peaches to your cream mixture, and about 1/2 cup of the liquid. Save the rest of the liquid for drinking…I love it!
  9. Cover with cling film and chill in fridge overnight. This helps develop the flavour, while also chilling the mixture thoroughly for the ice cream maker.
  10. Churn in ice cream maker per the manufacturer’s instructions.

There you are…a little bit of summer in your freezer :)

DSC_8998.JPG

{ 2 comments }

Alex and I got carried away buying produce last weekend. Okay, maybe it was just me.

Saturday at the Market
$60 bought us all these! There’s hidden zucchini in the back and everything!

The thing is, living in the arctic circle where winter lasts six months of the year and snow is the biggest bitch you’ve met in your life, I get a little (just a little) excited when summer comes and fresh produce is in plain sight. The Farmer’s Market at St. Lawrence every Saturday makes me happy, even if I have to get my elbows out just to walk through the half block of produce stalls along Jarvis Street. So this past weekend I was all “Wow! Yay! Love! Yum!” as I flitted from stall to stall, piling all these things (plus some meats and carbs and stuff) into the bags Alex was carrying. Oh yeah, he carried them all – but don’t feel sorry for him, he gets to eat all this stuff.

One thing I was thinking about making with all this stuff shocked me….for the first time in my life, carrot cake piqued my interest. I have long scoffed at the thought of “vegetables in my dessert”, but with all these pretty carrots with their cute little green tops, how could I say no? When I read that the original idea of carrot cake was to use carrots as a sweetener, I was even more intrigued. What a healthy dessert!

Pineapples in Carrot CakeCream Cheese Icing - Carrot Cake

The cream cheese icing that goes with carrot cake might also have something to do with my interest. It’s dairy, and has cheese, and therefore has calcium! How much healthier can I get? :P

(Recipe edited in 2012 to include extra amazing-ness. You’re welcome.)

You will need:

  • 3 large eggs
  • 1 cup (200g) granulated sugar
  • 3/4 cup (80g) packed brown sugar
  • 3/4 cup (170g) vegetable oil – I use canola or rapeseed
  • 1/4 cup (57g) extra virgin coconut oil – really adds to the taste!!
  • 1 tsp vanilla extract
  • 1 cup (140g) all-purpose flour
  • 1 cup (140g) self-rising flour
  • 1 tsp baking powder – no-aluminum baking powder is best!
  • 1 tsp ground cinnamon
  • 1/4 tsp ground cloves
  • 1/4 tsp ground ginger
  • 1/4 tsp freshly ground nutmeg
  • 1/4 tsp salt
  • 2 cups grated carrots
  • 1/2 cup chopped nuts – hazelnuts and walnuts are both good choices
  • 1/2 cup apple sauce (or fruit puree of your choice) – apple sauce is mild and doesn’t take away from the taste. Originally I used chopped pineapple chunks – those are good too.

Putting it together

  1. Preheat oven to 350 degrees Fahrenheit. Butter and flour 2 round or square pans, and line bottoms with parchment paper. I used 8″ square pans.
  2. In a medium bowl, toss the dry ingredients together.
  3. In an electric mixer with a paddle attachment, or with a handheld mixer, whip eggs together for about a minute until light yellow in colour. Add in sugar and continue beating for 3-4 minutes until thick and creamy looking.
  4. With the mixer still going, stream in the vegetable oil, and the vanilla extract.
  5. Scrape down bowl and add in half of the dry ingredients. Use a low speed to incorporate everything together. Scrape down again, and add in the second half of the dry ingredients. Use low speed to incorporate again.
  6. Fold in the carrots along with any juice that the carrots might’ve left behind from the grating – it’s a thick mixture, so make sure you stir enough to distribute the carrots evenly. Now fold in the nuts and fruit puree/apple sauce.
  7. Distribute mixture into the two pans and bake for about 30 minutes or until a cake tester comes out clean.
  8. Let cool on rack while you move on to the next step – the icing!

The Best Cream Cheese Icing

I got this off the back of a baking mix once and when I gave people the cupcakes that went with this icing, all I got was, “Oh my goodness the icing!” and a bunch of rude noises. I gathered it must be the best cream cheese icing then, and haven’t deviated from it since.

The magical ingredients

  • 8 oz. package of cream cheese, slightly colder than room temperature
  • 4 oz. (1 stick) unsalted butter, more or less room temperature but not too mushy
  • 1/8 tsp salt
  • 1/2 tsp vanilla extract
  • 12 oz. sifted icing sugar

Whip your icing
In the bowl of an electric mixer with paddle attachment, beat the cream cheese and butter together with the salt and vanilla on a lower speed until creamy, about 2-3 minutes. Add in the icing sugar slowly and on a low speed just until combined. If you whip on high or whip too long, it’ll become airy and light. If you would like a thick and creamy icing, do not overmix. Voila!

Finished product

Ice the cake according to your mood. I typically opt for fussy and overachieving, but in this case I decided it was charming to do homemade with sprinkles to hide the flaws. Totally didn’t help that the icing didn’t yield quite enough to smother the cake, so it wasn’t easy to work with. Whatever, it’s not some perfectionist wedding cake, after all.

{ 0 comments }

The First 5K are the Hardest

For the first time this past weekend, I missed the long distance training (16K). As I’ve progressed in my training, I’ve recently come to realize that I can actually run 16K without passing out, and as such, have also become a bit more lax about the training regimen. So typically me – great start, not sure about the finish.

The other things impeding my run recently would be the weather (it has gotten humid and hot like what August should feel like), and the fact that more and more, I’m finding the first 5K to be the hardest to overcome. I’ve heard about this from the coaches as well, but for the first 30 minutes or so, it’s not easy to find my “groove”. I feel like my breathing is all out of sorts, and I tend to not find my pace just quite yet. Of course, most of my weekday runs last about 30 – 45 minutes, so it’s really hard to get motivated to go out in the mornings. One last thing that I forgot to mention – now that we’re past summer solstice, it’s actually getting darker at 6:30 in the morning. Why would I even bother?!

This morning I decided to make up for the lack of mileage and did a 10K. It felt weird going out by myself for any distance past 6K, and I really had to push myself to make it to the halfway mark when things began getting easier. Of course, I can’t do 10Ks every morning because I have to get to work at a decent hour and all, but hopefully I’ll squeeze in a few more of these in the coming weeks leading up to the actual race (in a month and 10 days!) to try to build up my stamina, too.

A year ago if you asked me about running 10K, I would’ve looked at you dubiously and reminded you that I almost died running 1K on the first day of bootcamp. Who’da thunk?

{ 4 comments }