This recipe is probably from a lovely little Italian grandmother who not only makes the best tiramisu, but also the greatest pastas and tomato sauces. However, the live demonstration in my kitchen was done by an Italian man in his twenties. Nonetheless, I can guarantee that the recipe originated from a rustic kitchen in Italy, because this man eyed me with suspicion as I laid out my colourful measuring spoons, and was fascinated with my KitchenAid’s ability to improve his efficiency tenfold.
It was super refreshing to have someone else take control of my kitchen to show me something new. Not only did I get a chance to scribble furiously on my notepad, but I was also able to click away on my camera freely to get some action shots of the process.
After chasing this man with “how many spoonfuls of sugar?” and “can you please throw that into this lovely measuring spoon before dumping it in the bowl?”, I think I might have a recipe for you. Try it, and let me know what you think!
Ingredients
- 6 eggs, whites and yolks separated
- 1/2 tsp salt
- 1 500g carton of mascarpone cheese
- 6 tbsp sugar
- Two packages of Savoiardi cookies, also known by North Americans as ladyfingers
- A giant pot of coffee – at least 8 cups from your coffee maker. Espresso would make your Italian grandma proud, but drip coffee would do if you’re in Canada
- A little bit of cocoa powder
The “Right” Way to Assemble Your Tiramisu
- In an electric mixer with the wire whisk attachment, whip the egg yolks and 2 tbsp of the sugar together until it’s light butter yellow. This should take about 5-8 minutes, and can be done at medium-high speed.
- Meanwhile, whip the egg whites and salt together in a separate bowl, using an electric handheld mixer, until soft peaks form.
- Add 1/3 of the carton of mascarpone cheese to the egg yolks mixture and continue to whip for about 3 minutes on medium-high speed. Then add in 2 tbsp of sugar and whip for about 3 minutes. Repeat this step. You should finish with the last 1/3 of carton of cheese.
- Incorporate about 1/2 of the egg white mixture into the egg yolks and beat for 3 minutes on medium-high. Then add in about 2 tbsp of egg yolks at a time, whipping for about 10-15 seconds between each addition, until all of the remainder of the egg whites have been added.
- Once everything’s been added, taste the mixture to make sure it’s lightly sweetened, but not too sweet. You can adjust at this point if you think you need more sugar, but we found that at 6 tbsps, it was just about right. Tiramisu isn’t meant to be a super sweet and dense dessert! Whip for another 2 minutes on medium high.
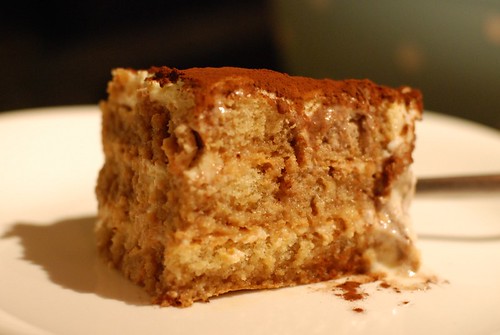
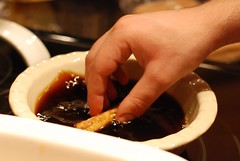
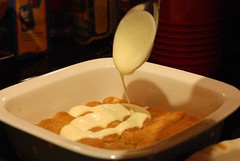
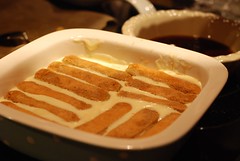
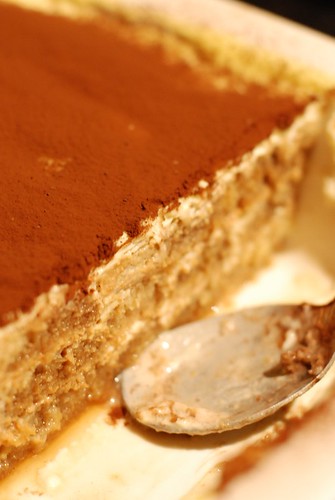
- Dip the cookies quickly in a shallow pan full of coffee, and then arrange on a dish. Usually the Pyrex glass ones would work well. Drizzle the tiramisu cheese mixture over your layer of cookies lightly just until a thin layer covers the cookies evenly. Repeat until you get to the top of the pan, and finish off with the layer of tiramisu cheese.
- Refrigerate for at least 12 hours prior to eating. Just before serving, dust some cocoa powder on top and if you’re feeling really decadent, maybe also some chocolate shavings.
Enjoy!
{ }
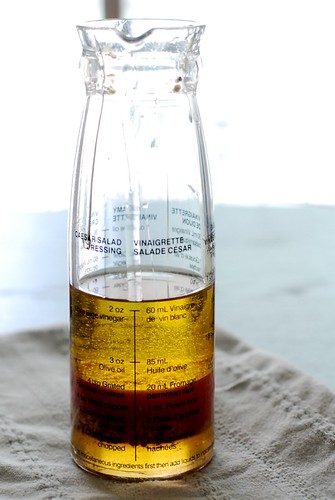
This post will be a quick one. A friend recently told me about a salad dressing that she came across that was “so good you could eat it by the spoonful”. In fact, she had made it so often since she got the recipe, that she had it committed to memory. Thus the recipe was given to me on a purple Post-It Note that has become a permanent decoration in my kitchen. Alex and I have become addicted to this dressing, and have had more salads that we normally would.
The best part about the recipe? Everything is proportional, so you only need one measuring spoon. In my example below, I’ve used a tablespoon.
Ingredients
- 3 tbsp. olive oil
- 1 tbsp. red wine vinegar
- 1 tbsp. honey or agave nectar
- 1 tbsp. dijon mustard
- 4 tbsp. almond slivers, toasted
- salt and pepper to taste
Putting it together
- Measure out the olive oil first into a bowl or a salad dressing jar. This way, your spoon has a light layer of oil to help get the honey out later.
- Add in the honey, dijon mustard, and red wine vinegar. Make sure you don’t skimp on the honey – a little more sweetness makes all the difference!
- Finely chop up the toasted almonds. You could just put in ground toasted almonds if you have that on hand. However, I like toasting mine and then chopping – a little bit of grittiness in the dressing isn’t bad at all!
- Add salt and pepper to taste – I find I usually need about 1/4 tsp. salt and some freshly ground pepper would do.
Let it sit for about an hour before serving, so you get more almond flavour coming through the dressing. The small batch above can last us a couple of days, and the dressing is equally as delicious, if not more, on the second and third days. We usually just toss it together with romaine lettuce, tomatoes, red onions, and cucumbers – simple and delightful!
{ }

I feel like it’s taken forever to get to July, and we’ve had so much good weather already that I am excited about how much more summer we have left. However, the weekends for July and August are filling up so quickly that I’m afraid it’ll all pass by before I know it.
Starting from last weekend, we had the best visitors in town for the 4th of July long weekend, and I have much to post about that. This weekend has officially started with lots of errands, since we’re moving at the end of the month. But…we also have lots of fun things kicking off. Tomorrow’s our first rowing league practice, which I’m excited about, and also a little scared (remember, I don’t swim…at least, not well). I also did some prep work for something else happening tomorrow, and here’s a sneak peek!!

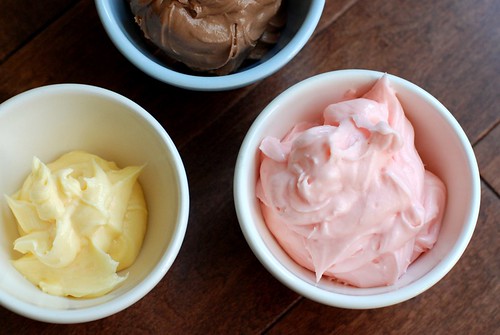
I was also feeling quite decadent today in my flurry of kitchen prep, that I made the ice cream cones covered in sprinkles. A coworker and I were lamenting that as little kids, our parents never really let us get the waffle cones with chocolate and sprinkles. So I made them. I have quite a few issues with things I wasn’t allowed to have as a kid, and that might also be the reason why my mom ended up with three Easy-Bake ovens to give away when my sister and I moved away.
To make these, it’s quite simple:
- Melt semi-sweet chocolate wafers in the microwave, and stir until smooth
- Brush onto inside of a store-bought waffle cone (sorry, I cheated) with a small heat-proof spatula. Chill in freezer as you continue with the other cones.
- Take out of freezer. Brush the outside rim with the chocolate, making sure not to put too thick of a coat on, and also not too deep (the sprinkles will add quite a bit of weight if you do too much chocolate).
- Dab in a shallow pan covered in sprinkles, until the edges are all covered.
- Chill again in freezer while you work on the others. Once you’re finished, give them a few more minutes in the freezer, then take out and wrap individually in parchment or wax paper. Store in a place where things won’t be squished.

Stay tuned for what all these fun things are for!!
{ }