on Tuesday 2 October 2012
New month, new beginnings! I have finally gotten off our IKEA chairs (no couch yet, ha) and gone for a run, my first since some time in July or early August. Hmmm. It was the perfect running weather this morning, and I discovered a good route that manages to avoid heavy traffic. Could this be meant-to-be? I’m obviously not going to be doing the Cardiff Half Marathon in a couple of weeks like I had originally planned, so now I’m looking at a January race to keep me motivated. Stay tuned on how long this running phase lasts!
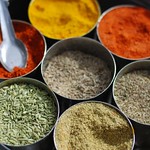
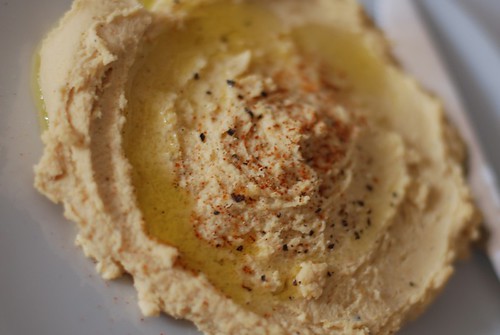
With running, there will be healthier eating around here! I’ve recently been on a hummus-perfecting-roll. Hummus is really easy to make, although it can require a bit of planning ahead. The ingredient list below looks long and therefore suggests a laborious process; however, once you’ve gathered your ingredients (and they’re all fairly cheap to procure), it’s just a matter of throwing everything together in a blender. The spices make the list look long, but then again, a lot of these spices are staples in my kitchen, so the investment wasn’t too bad. I start with dry chickpeas, but I’ve given the rough quantity you’d need if you were to buy cooked/canned chickpeas, too. See? Simple.
As I mentioned in a previous post, I really enjoyed Melissa Clark’s Cook This Now, and I’ve been playing with a lot of her recipes in the kitchen. This is one of those recipes I keep going back to. I’ve been trying to pare down some of the recipe yields in her book, decreasing the quantities until I make just the right sized batch for Alex and me to enjoy. The recipe below makes just enough for us, so I know that it’ll be consumed within a day or two before we get tired of the hummus and push it to the back of the fridge…only to discover a mouldy container months later. If you were entertaining, I’d suggest quadrupling the recipe (but go easy on the garlic – 8 cloves altogether might be a bit too much!).
Homemade Small-Batch Hummus – makes about 2/3 cup
- 60g dry chickpeas, or 150g cooked and drained chickpeas
- 1/2 dried bay leaf
- 1 small whole peeled garlic clove
- 1 small crushed/minced garlic clove
- 1/4 lemon
- 1/8 – 1/4 tsp salt
- pinch ground cumin
- 1/8 – 1/4 tsp cayenne pepper
- 1/8 – 1/4 tsp freshly ground pepper
- 10g (2 tsp.) tahini paste
- 15mL (1 tbsp.) water
- 15g (1 tbsp.) olive oil
- Soak dry chickpeas overnight. Bring a pot of generously salted water, bay leaf, and whole garlic clove to a boil. Add chickpeas, bring back to a boil, and turn down the heat. Cover and let simmer for 45 minutes to an hour, or until the chickpeas are cooked through and soft.
- Drain the chickpeas, reserving the liquid if you remember to do so. You can use this liquid instead of fresh water for the recipe.
- Peel each chickpea. Yes, you read that right. You don’t have to, but I do it, and it really does make your hummus that much smoother. Peeling the chickpeas probably takes away some fibre content, so if you’d rather be wholesome-like, go ahead, that’s cool.
- Whizz the minced garlic clove, juice of 1/4 of a lemon, tahini, water, salt, cayenne, cumin, and pepper together in a small food processor/blender.
- Add in chickpeas and purée. The mixture might be a bit dry and difficult to move around after a while, and at that point, you can drizzle in the olive oil. Continue to process until everything comes together beautifully.
- If the hummus in the blender looks too dry, you can add in water 1 tsp at a time, but give it a chance first. The paste always looks a bit thick to start with, but the liquids will be distributed properly and it’ll look OK.
Serve with a generous drizzle of good quality olive oil on top, and another pinch of cayenne or smoked paprika if you’ve got it. Goes well with everything, guilt-free.
{ }
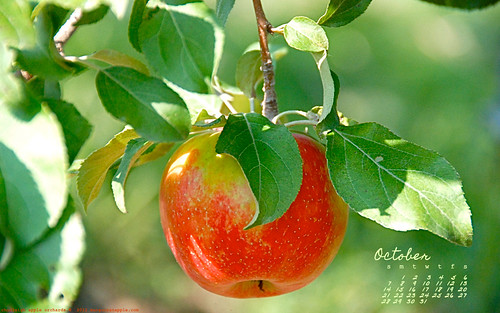
Look at that! I’m getting better at reading a calendar! It’s October 1st and voilà – the wallpaper.
The first day of October here in London has been very wet so far (anyone surprised?), but raindrops make the beautiful green shrubbery outside my kitchen window look much more lush and vibrant, so I can’t really complain (yet).
The air has been crisp, and we’ve been having lots of soups and stews to keep warm. My days feel full, what with the consulting work I’m doing, the kitchen menu planning, the recipe testing, etc. etc. I’m not exactly “busy”, but I do feel like I’m constantly shocked at how quickly the days go by. My job search is slow. The (lack of) progress occasionally puts me in a panic, but then I try to remember how I much I would miss the freedom of staying in bed until half past eight just because it’s rainy outside. The job search is slow because I’m picky about what I’m applying for, and I’m not scouring all job sites from top to bottom for new opportunities daily. So I’ve only applied for a handful of jobs out there, and the waiting game should not be called a game, but more like a slow torture of the mind.
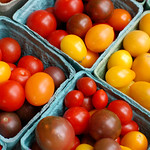
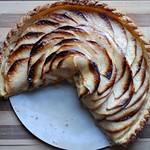
Anyway, with the arrival of autumn, we’ve been diligent in our apple and pear eating, so I thought an oldie would be a goodie here. This photo was taken back in 2008(!) at Chudleigh’s Apple Farms in Milton, Ontario. We took Alex’s nephew there for a day of apple picking, but really he was just the child-sized excuse for me to get my fill of apples.
Download the 2560×1440 October desktop wallpaper
Download the 1920×1200 October desktop wallpaper
Download the 1440×900 October desktop wallpaper
Download the 1280×800 October desktop wallpaper
{ }
on Thursday 20 September 2012
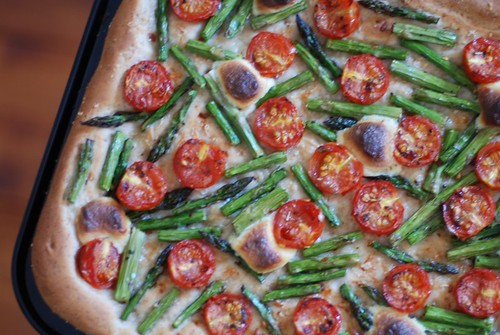
This is not the thin, chewy-yet-crunchy pizza crust from Naples. This is a hearty, homemade pizza crust that is home-y, slightly bread-y, with just the right amount of crunch around the edges. It does not require any planning ahead, because the dough just needs to rest and rise for as little as 15 minutes before baking. Therefore, it is my go-to for those nights when I have some veggies that could easily become toppings, and I can’t be bothered to do much more than throw everything into the oven and have a hot and delicious meal come out.
The other day I made it with cherry tomatoes and asparagus, and dotted the top with garlic and herb Boursin cheese. Today, I’m making it with torn up pieces of prosiutto and asparagus, to take on a picnic with us later this evening – for the outdoor screening of The Artist! Life is hard, isn’t it?

Pizza Crust Recipe – makes a 10-12″ pie, or a 15″x10″ rectangular cookie sheet
- 6g (1 tsp.) dry yeast
- 120mL warm water
- 10g (2 tsp.) honey – substitute with sugar if you don’t have honey
- 135g all-purpose flour
- 70g spelt flour
- 15g good quality olive oil
- 5g salt
- 3-5g (1 tbsp.) dried herbes de provence or mixture of herbs

- Dissolve honey into the bowl of warm water, and sprinkle yeast in the bowl. Let sit for a few minutes until the water gets all foamy and yeast-y.
- In the mean time, weigh out the flours and salt, add in the dried herbs, and stir it together.
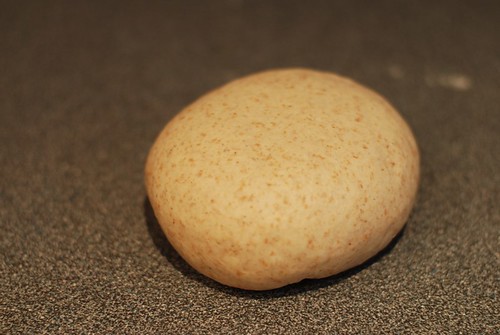
Add the yeast mixture and the olive oil to the dry ingredients, and work into a dough. If it’s a bit wet and tacky, sprinkle in extra flour about 1 tbsp at a time. The dough should not be dry!
- Once everything comes together, knead the dough for a few minutes until smooth and velvety. Put back into the bowl and cover with plastic or a towel. Let the dough rest for anywhere between 15 – 60 minutes. (Really. There’s no science to this, apparently. I’ve been so hungry that I waited 15 minutes, and I’ve made the dough and left it to rise for hours while I went grocery shopping. Anything goes.)
- When you’re ready, take the dough out of the bowl, and knead a couple of times. Sprinkle your work surface lightly with flour, and roll out dough into the shape of your pan. You can roll out a rough shape and just stretch and press with your hands – the dough should be elastic and easy to shape.
- Sprinkle a bit of corn meal, flour, or wheat bran onto your baking sheet before putting the dough down. Make sure the dough is stretched to all corners.
- Let the dough rest again while you prep your toppings. I chopped up the asparagus stalks and cherry tomatoes roughly, tossed them with a bit of olive oil, and arranged them on the pizza in a single layer. I also sprinkled some grated parmesan underneath the veggies to prevent the cheese from browning too quickly.
- Bake in a preheated oven at 375 degrees Fahrenheit for about 20 – 30 minutes, or until the crust is golden brown and the veggies are cooked. Let rest for a few minutes on the baking sheet before cutting and serving.
Enjoy your dinner!

{ }